IT/Hardware/Routers/USB Hard Drive/Samba on Dolphin: Difference between revisions
Access restrictions were established for this page. If you see this message, you have no access to this page.

AC-68U
No edit summary |
Walttheboss (talk | contribs) No edit summary |
||
| (2 intermediate revisions by the same user not shown) | |||
| Line 8: | Line 8: | ||
* Open Dolphin (Kubuntu's File Explorer) and you will see "Network" in the left column | * Open Dolphin (Kubuntu's File Explorer) and you will see "Network" in the left column | ||
[[File:Asus Samba USB.png | thumb | AC-68U]] | [[File:Asus Samba USB.png | thumb | AC-68U]] | ||
* Click on Network and then Samba | |||
* Type the ip in where the router is located. | |||
**For example smb://192.168.2.1/ | |||
* The rest should appear. | |||
*You may need to input a username and password. | |||
*This the user you setup on the router and the same password as the admin password on the router | |||
** It is NOT the WiFi password | |||
Latest revision as of 16:00, 24 January 2020
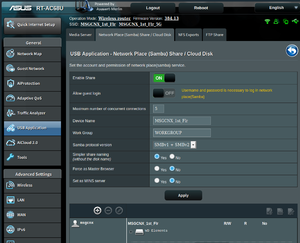
- Plug in the USB External Hard Drive
- Log in to the Router
- Navigate to the USB Applications >>> AI Disk >>> Advanced >>> Samba
- Turn it on.
- OPTIONAL: make changes, (Not Recommended)
- Open Dolphin (Kubuntu's File Explorer) and you will see "Network" in the left column

- Click on Network and then Samba
- Type the ip in where the router is located.
- For example smb://192.168.2.1/
- The rest should appear.
- You may need to input a username and password.
- This the user you setup on the router and the same password as the admin password on the router
- It is NOT the WiFi password