Arduino/Projects/Cruise Control: Difference between revisions
Walttheboss (talk | contribs) No edit summary |
Walttheboss (talk | contribs) No edit summary |
||
| (5 intermediate revisions by the same user not shown) | |||
| Line 11: | Line 11: | ||
==Relay Control overview== | ==Relay Control overview== | ||
[[Arduino/Projects/Cruise Control/Relay Control | A Relay Control is a module that switches on and off a device or motor when the Arduino board switch the magnetic coil on and off. In this project we will use the relay control module to switch the clutch on and off and the tension coil to be pulled or loosen depending on the variables. | ||
[[Arduino/Projects/Cruise Control/Relay Control Code Sample|Relay Control Code Sample]] | |||
Latest revision as of 16:27, 7 November 2023
Project Description
This project is a cruise control add-on for cars that do not have this tech. The general way this will work is it will have an Arduino uno R3 board that will receive input from an A3144 hall sensor. With that input from the hall sensor, the Uno R3 will calculate the car's rpm, translate that into a speed, and then take that and compare it to the last 100m that it last calculated. It will then compare that with the given speed it was provided by said user. With this known information, the car will then have the cruise control servo speed up the car or slow the car down. It will continue to calculate the speed of the car and compare and fix any problems. It will also have an emergency off switch that will signal the program to stop at any time and have the user take full control of the speed of the car.

Pins Explanation
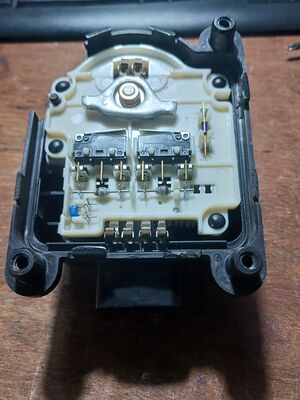
This is the underside of the cruise control module; it has 6 pins. I will list out the pins top to bottom left to right. The top two pins are the brake pins which engage the cruise control feature. These two pins will not be in use because of their location. Now on the bottom starting from left to right the first and second pins are the motor control and swivel the double sided thing back and forth. You can reverse the polarity to move it left or right. The second pair of pins do the same thing as the pins on top. Those pins will be used because they go directly to the cable adapter.

How the Cruise Control Module Works
With some deep research and a few sparks, I with the help of Mr. Demoss will now present how the Cruise Control Module works. So as we know the module has 6 pins 2 of which are redundant and we will not worry about. So with four pins 2 of them being the clutch and 2 of them being the motor. So at the start the clutch will be engaged and the motor will not be with the clutch engaged, the wire will not move and the cruise control will be active. When the speed variable is to be adjusted the motor will activate it either going left or right. The motor head which has two prongs will hit a clicker which will disengage the motor this will also happen if the motor tries to over adjust. The motor will be able to move even when the clutch is engaged but the tension rod/wire will not be able to move in any way. As soon as the clutch is engaged the speed and tension will be set and can not be moved unless the motor engages.
Relay Control overview
A Relay Control is a module that switches on and off a device or motor when the Arduino board switch the magnetic coil on and off. In this project we will use the relay control module to switch the clutch on and off and the tension coil to be pulled or loosen depending on the variables.