IT/Hardware/Routers/USB Hard Drive/nfs exports: Difference between revisions
Access restrictions were established for this page. If you see this message, you have no access to this page.

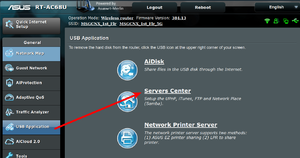
Step 1 
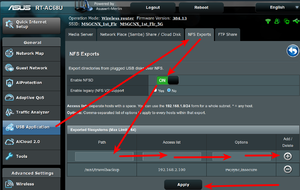
Step 2
Walttheboss (talk | contribs) No edit summary |
Walttheboss (talk | contribs) No edit summary |
||
| Line 1: | Line 1: | ||
=== Samba === | ===Samba=== | ||
* This seems to be the industry standard | *This seems to be the industry standard | ||
* We would have liked this as it makes setting things up in Windows easier | *We would have liked this as it makes setting things up in Windows easier | ||
** But then again we don't use windows. | **But then again we don't use windows. | ||
* BUT we have never gotten it to work | *BUT we have never gotten it to work | ||
** by working we mean automounting in fstab | **by working we mean automounting in fstab | ||
=== NFS === | ===NFS=== | ||
* This is how we setup the servers at the MSGs to share files across the network | *This is how we setup the servers at the MSGs to share files across the network | ||
* It is very easy to setup. | *It is very easy to setup. | ||
** The following documentation is from our beloved Asus AC68(may she live forever) | **The following documentation is from our beloved Asus AC68(may she live forever) | ||
* Plug in the USB drive | *Plug in the USB drive | ||
** We recommend ext3, ext4 or NTFS | **We recommend ext3, ext4 or NTFS | ||
* Turn the service on | *Turn the service on | ||
* Put in the information as shown to share to one machine. | *Put in the information as shown to share to one machine. | ||
** Usually the one that will be making the backups | **Usually the one that will be making the backups | ||
** | ** | ||
[[File:NfsExportPic1.png|left|thumb|Step 1]] | [[File:NfsExportPic1.png|left|thumb|Step 1]] | ||
[[File:NfsExportPic2.png|center|thumb|Step 2]] | [[File:NfsExportPic2.png|center|thumb|Step 2]] | ||
* In fstab add the following line | *In fstab add the following line | ||
** 192.168.2.1:/mnt/travelbackup /mnt/samba nfs auto 0 0 | **192.168.2.1:/mnt/travelbackup /mnt/samba nfs auto 0 0 | ||
** Don't forget that fstab need an empty line at the bottom of the file. | **Don't forget that fstab need an empty line at the bottom of the file. | ||
** Hit return a few times and save the file. | **Hit return a few times and save the file. | ||
* run the command to mount all the shares | *run the command to mount all the shares | ||
<code>sudo mount -a</code> | <code>sudo mount -a</code> | ||
* Now the share will appear in Dolphin | |||
* You can use rsync to backup to it | *Now the share will appear in Dolphin | ||
*You can use rsync to backup to it | |||
==== Problems ==== | |||
* It is very unstable for hot plug and unplug | |||
* If you try to mount and it is not there it will hang the system. | |||
* Best implemented as an always on system that can be yanked in an emergency. | |||
* Better at that point to just plug into the server as needed. | |||
Latest revision as of 13:30, 27 February 2020
Samba
- This seems to be the industry standard
- We would have liked this as it makes setting things up in Windows easier
- But then again we don't use windows.
- BUT we have never gotten it to work
- by working we mean automounting in fstab
NFS
- This is how we setup the servers at the MSGs to share files across the network
- It is very easy to setup.
- The following documentation is from our beloved Asus AC68(may she live forever)
- Plug in the USB drive
- We recommend ext3, ext4 or NTFS
- Turn the service on
- Put in the information as shown to share to one machine.
- Usually the one that will be making the backups


- In fstab add the following line
- 192.168.2.1:/mnt/travelbackup /mnt/samba nfs auto 0 0
- Don't forget that fstab need an empty line at the bottom of the file.
- Hit return a few times and save the file.
- run the command to mount all the shares
sudo mount -a
- Now the share will appear in Dolphin
- You can use rsync to backup to it
Problems
- It is very unstable for hot plug and unplug
- If you try to mount and it is not there it will hang the system.
- Best implemented as an always on system that can be yanked in an emergency.
- Better at that point to just plug into the server as needed.